 |
| Description |
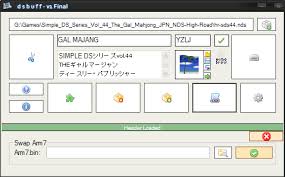
Dsbuff is a Windows .NET application which allows you to perform basic operations on *.nds files. It removes the need to use batch files or command line arguments just to perform a simple task.
How to Use dsbuff:
On the top of the form, you see a large browse button. Use this to find your *.nds file. Once you have done that, then there are several things you can consider doing. I think this would be a good place to list the features:
*Trim
*DLDI
*Unpack
*Pack
*Arm7
*Drive
*CrashMe Scan
*Edit the Header
Each of these features does a different operation. They will be explained further down. For now, an example scenario could be:
You want to shrink the *.nds file, so you use the Trim function. The header has some random advertising text in it, so you remove it and press the Edit Header button. Then you hit the Drive button to send the *.nds file straight to your flashcard.
That is just an example of what you can do with this program, and how you can use it.
Feature Description:
Trim: Use this to remove excess empty data from *.nds files. This empty data is not needed for use, only for allowing the file to fit on an official cartridge.
DLDI: Patches homebrew *.nds files so that they can use your flashcards filesystem. Sometimes this is mandatory for homebrew to function. For instance, PocketPhysics requires patching to use it's Open/Save functions. Many newer flashcards do this for you automatically.
Unpack: Extracts the contents of an *.nds file. Unlike *.gba files, *.nds files have a file structure which can be extracted and modified. This allows for easy editing of a game. You can select to have every file unpacked, or only a few sections.
Pack: This compiles the unpacked *.nds structure back into a single file. This new file would be identical to the original if you didn't make any changes to the previously unpacked files.
Arm7: Replaces the arm7.bin in the *.nds file structure with a different one. This feature may be slightly outdated/useless now, but I don't have any other features to add it its place. Primarily used by those who need the Arm7 fix in order to run the game on their flashcart.
Drive: Copies the *.nds file to your specified location, whether it be your flashcard or a hard drive. **Be sure to set this option in the Options menu** It will be sent to C: by default!
Edit the Header: This modifies the internal header in the *.nds file, which is basically a description and an icon. This is different from the other features, in that it is situated in the middle of the form, instead of just being a button. You can change the (ordered from top-left to bottom-right) Game Title, Game Code, Game Description, and Game Icon. The only confusing part might be the icon controls. The big picturebox shows the icon, and you can either double click that or click the folder button beside to to browse for a different icon. The little save button saves the icon to your computer. The small arrow sets the picturebox back to the icon in the file, incase you browsed for the wrong one and wanted to leave the current one in the *.nds file. The checkbox is checked if the file is homebrew/has an invalid header. You shouldn't have to worry about it(set automatically). To save the changes, press the Save Header button, which appears after you make any changes.
Icon Database: This is the button below the homebrew checkbox near the header controls. It allows you to search for a game icon by release number. I really need a different database to search from, since the icons will probably not work, they are poor quality and do not meet the icon pallete color requirements. So if you receive an error when trying to save the header with a downloaded icon, it is just the incorrect formatting of the icon.
Notes:
* You MUST have the dsbuff.exe.config file in the same directory as the exe! This holds all your settings, and without it you will receive errors a lot!
* If anyone was still wondering, you need the .NET Framework 2.0 or greater to use this! |
|

 Main
| Rules/FAQ
| Discord
| Memberlist
| Latest posts
| Stats
| Ranks
| Online users
 Main
| Rules/FAQ
| Discord
| Memberlist
| Latest posts
| Stats
| Ranks
| Online users


